Bullet Journal First Page Ideas: The Ultimate Guide
Looking for some bullet journal first page ideas? You've come to the right place! Everyone know the most important (and, let's face it, most fun) part of bullet journaling is squaring up to that crisp, white first page. *chef's kiss*
Creative Approaches for the First Page
Your first page sets the mood for your entire bullet journal. You can make it personal with colors and decorations, add words that inspire you, or create a bold design that catches your eye every time you open it.
Cover Page Inspirations
A strong bullet journal cover page gives your journal personality right from the start. You can try a simple title page with your name and the year in bold letters. Add different colors using markers or colored pencils to make the text pop.
Washi tape works great for creating borders or frames around your cover page. Layer washi tape strips in different patterns for a unique look. You can also draw simple shapes like circles, stars, or flowers around your title.
A monthly cover page offers another option for your first page. Write the month name in large letters and add small drawings that match the season, like leaves for fall months or snowflakes for winter.
Try these popular cover page layouts:
- Minimalist design - Clean lines with one or two colors
- Floral patterns - Hand-drawn flowers around your title
- Geometric shapes - Triangles, hexagons, or diamonds in a pattern
- Banner style - Your title inside a ribbon or banner shape
Great Places for Motivation
Your first page is a great place to add quotes or words that keep you motivated. Pick a word or phrase for the year that means something to you. Write it in the center of your page in your best handwriting.
You can also create a small list of goals or intentions right on your first page. Keep it short with three to five items so you see them each time you open your journal.
Some people prefer adding a favorite quote from a book, song, or person they admire. Frame the quote with a simple border or decorative elements. This is a great day to remind yourself daily of what matters most to you.
A mood tracker or habit tracker on your first page helps you stay focused from day one. Draw small boxes or circles you can color in as you go through the year.
Fun Ways to Personalize
Making your first page truly yours means adding elements that reflect your interests. Draw small icons related to your hobbies like books, coffee cups, cameras, or musical notes.
Photos or magazine cutouts add a fun way to personalize your page. Tape or glue small images that inspire you around your title or in the corners. Mix these with hand-drawn doodles for contrast.
Try different lettering styles throughout your page. Use bubble letters for your main title and cursive for smaller text. You can practice various creative approaches until you find what feels right.
Color schemes make a big difference in how your page looks. Pick two or three colors that work well together and stick with them. You can use:
- Warm tones (reds, oranges, yellows)
- Cool tones (blues, greens, purples)
- Neutrals (blacks, grays, browns)
- Pastels (light pinks, blues, yellows)
Add stickers or stamps if you have them. These give your page texture and visual interest without requiring drawing skills.
Setting Up Your Index and Future Log
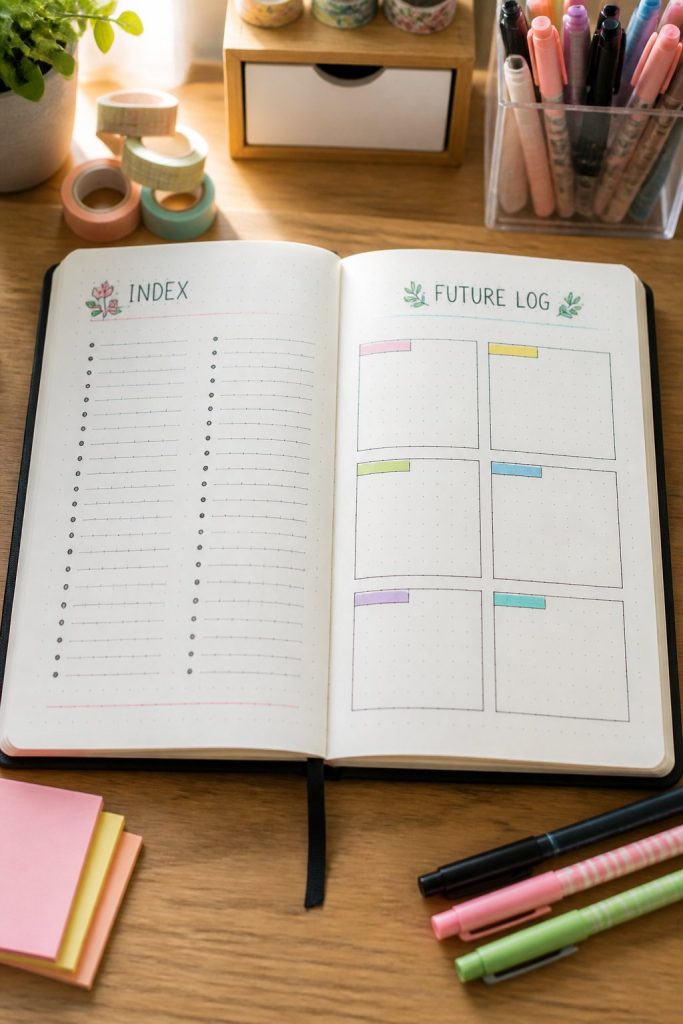
Your first few blank pages should include an index to help you find everything and a future log to track events across the entire year. These two elements work together to keep your bullet journal organized from the start.
Organizing with an Index Page
Your index page belongs on the very first page of your notebook. Leave about four pages blank at the beginning for your index because you'll fill it in as you add new sections to your journal.
The index works like a table of contents. Write the topic or collection name on the left side and the corresponding page number on the right. You can draw a simple line down the middle or use two columns to keep everything neat.
As you create new pages throughout your journal, come back to your index and add them. You might list "monthly log - August" as page 12 or "book tracker" as page 45. This system makes it easy to flip directly to any section without searching through your entire notebook.
Creating a Future Log
Your future log should be one of the first pages right after your index. This spread lets you see the entire year at once and plan ahead for upcoming events.
The simplest way to set up a future log is to divide two facing pages into twelve boxes, with each box representing one month. Write the month names at the top of each box. You can also use a dedicated page for each month if you prefer more writing space.
Use your future log to write down birthdays, appointments, deadlines, and trips that happen months from now. When you start each new month in your journal, check your future log and transfer those events to your monthly spread.
Incorporating Essential Trackers
Starting your bullet journal with the right trackers helps you monitor what matters most from day one. A mood tracker, habit tracker, and monthly goals page give you tools to understand yourself better and build positive changes.
Mood Trackers for Self-Awareness
A mood tracker on your first page offers a great way of spotting patterns in how you feel throughout the month and year. You can create a simple calendar grid where each day gets colored based on your mood. Pick 4-6 colors like yellow for happy, blue for sad, green for calm, and red for stressed.
Another option is a mandala design where you color one section each day. This makes a pretty pattern while tracking your emotional state.
The most important thing about mood tracking is keeping it simple so you actually use it. Draw small boxes, circles, or hearts for each day of the month. Add a color key at the bottom so you remember what each shade means.
Habit Trackers for New Habits
Habit trackers help you build new habits by creating a visual record of your daily actions. Set up a grid with habits listed down the left side and dates across the top. Fill in a box each day you complete the habit.
Start with just 3-5 habits. These might include drinking water, exercising, reading, or taking vitamins. Too many habits can feel overwhelming and make you quit.
You can also try a chain tracker where you draw a line connecting each day you complete a new habit. Breaking the chain becomes something you want to avoid. This works well for habits you want to do every single day.
Monthly Goals and Gratitude Logs
Your monthly goals section should list 3-5 specific things you want to accomplish. Write them as clear statements like "read 2 books" or "save $200" instead of vague ideas. Add small boxes next to each goal so you can check them off.
A gratitude log gives you space to write one thing you're thankful for each day. Draw 30-31 small lines or boxes for the month. Writing just one sentence helps you focus on positive moments. You can place this next to your monthly goals to balance achievement with appreciation.
Planning with Logs and Spreads
Your bullet journal's opening pages work best when they include core planning structures that help you organize time at different scales. Setting up daily logs, weekly spreads, and monthly layouts on your first pages creates a system you'll reference throughout the year.
Daily Log Structure
Your daily log tracks what needs to happen each day and serves as the backbone of your bullet journal. You can set up a simple format on your first page that shows how you'll structure each day going forward. Most people include the date at the top, followed by a list of daily tasks with bullet points or checkboxes.
A basic daily log includes three main elements: tasks you need to complete, events happening that day, and notes you want to remember. You can add time blocks on the left side to schedule specific activities. Some might prefer minimalist or maximalist daily layouts depending on how much detail they need.
Keep your daily log template simple on the first page. You can always adjust the format as you learn what works for your routine.
Weekly Spread Layouts
A weekly spread gives you a bird's-eye view of seven days at once. You can dedicate one or two pages on the front of your journal to show your weekly layout template. Most weekly spreads divide the page into seven sections, one for each day.
Popular layouts include vertical columns, horizontal rows, or a grid format. Some people add habit trackers, meal plans, or water intake boxes directly into their weekly spread. You might include small boxes for each day's top three priorities or a notes section at the bottom.
Your weekly spread helps you plan ahead and see patterns in your schedule. It's especially useful for tracking recurring tasks or weekly goals.
Monthly Spreads and Logs
Monthly spreads combine a calendar view with task planning for the entire month. Your first page can include a sample monthly log that shows how you'll organize each month throughout your journal. A typical monthly log has a calendar grid on one page and a task list on the facing page.
The calendar portion displays all days of the month with space to note appointments and events. The monthly log page lists larger tasks, goals, or projects you want to accomplish before the month ends. You can add sections for birthdays, bills due, or monthly habits.
Setting up a future log for long-term planning on your first pages helps you note events or tasks months ahead. This keeps important dates from slipping through the cracks.
Adding Style and Personality
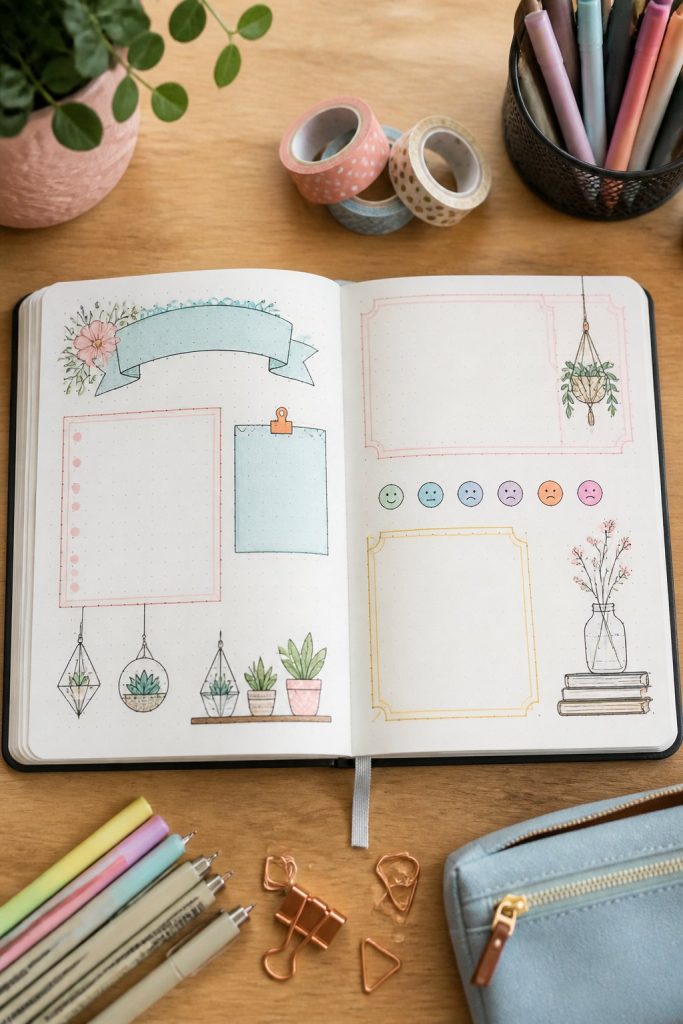
Your bullet journal's first page becomes uniquely yours when you add decorative elements and creative touches. Simple materials like colorful tape and hand-drawn designs can transform a blank page into something special that reflects who you are.
Using Washi Tape and Different Colors
Washi tape offers an easy way to add color and pattern to your first page without requiring artistic skills. You can create borders around your title or name by layering strips of tape in different colors along the edges. Try making geometric shapes like triangles or rectangles by cutting tape into smaller pieces and arranging them in patterns.
Use tape to frame important text on your page. Place a strip above and below your journal's start date or your name to make it stand out. You can also tear washi tape into smaller bits to create a mosaic-like background behind your title.
Color choices matter for your first page:
- Bright colors like pink, yellow, and turquoise create an energetic feel
- Pastels like mint green and lavender give a calm, soft look
- Neutrals like kraft brown and gray work for a minimal style
Mix two or three colors that complement each other instead of using too many at once. This keeps your page looking organized rather than overwhelming.
Hand Lettering and Doodles
Writing your journal title or the date in different letter styles adds a personal touch that printed text cannot match. You don't need perfect handwriting to make attractive letters. Start by writing your title in pencil, then go over it with a pen while making the downward strokes thicker than the upward ones.
Simple doodles fill empty spaces on your first page. Draw small flowers, stars, or hearts in the corners. Add tiny plants in pots along the bottom edge or scatter dots and swirls around your main text.
Easy elements to draw:
- Small triangles arranged in rows
- Simple leaf shapes
- Tiny banner flags on a string
- Basic flower shapes with five petals
- Dots in clusters of three or five
Practice your letters and doodles on scrap paper first. This helps you figure out spacing before you add them to your actual page.
Inspiration from Social Media
Pinterest offers the perfect place to find first page designs you can adapt to match your style. Search for specific themes like "minimalist bullet journal first page" or "floral journal covers" to find ideas that appeal to your personal preferences. Save images that catch your eye and identify common elements you can recreate.
Instagram accounts dedicated to bullet journaling show real examples of first pages people actually use. Look for posts tagged with terms like "bujo setup" or "new journal." Notice how others arrange their title, date, and decorative elements on the page.
Don't copy designs exactly. Instead, take one or two elements from different posts you like. You might use the letter style from one design and the border idea from another. This creates a fun idea that still feels original to you.
Fresh Starts and Special Themes
Your first page sets the mood for your entire bullet journal. The new year and starting a new journal both give you chances to pick themes that match what you want to achieve.
New Year Themes
A new year theme on your first page marks a fresh start in your journaling practice. You can write the year in large, decorative numbers at the top of the page. Add small drawings or stickers that represent what you hope for in the coming months.
Many people choose words like "Growth," "Balance," or "Adventure" as their yearly focus. Write your chosen word in the center of your first page using fancy lettering or calligraphy. You can surround it with small illustrations that connect to your theme.
Another option is to list three to five main goals for the year. Keep these short and clear. Use bullet points or numbers to make them easy to read. Some people add small checkboxes next to each goal so they can mark them off as they complete them throughout the year.
Unique Ideas for a New Journal
Creative first page designs help your journal feel special from the start. One great place to begin is with a color scheme that you'll use throughout your journal. Pick two or three colors and use them in a simple pattern or border on your first page.
You can also create a small "about this journal" section. Include the date you started, what you plan to use it for, and maybe even your contact information in case you lose it. Write this information in a decorative box or banner at the top or bottom of the page.
Try adding a favorite quote or song lyric that inspires you. Frame it with simple line art or leave it plain with beautiful handwriting. This personal touch makes your journal truly yours.
Making Your First Page Reflect Your Goals
Your first page becomes more useful when it connects directly to what you want to accomplish. Create a simple visual tracker for your top three priorities. Draw three small boxes or circles and label each one with a different goal.
One of the best things you can do is make a monthly milestone list. Write down specific targets for the first month, like "Read two books" or "Exercise three times per week." This keeps your goals front and center every time you open your journal.
You might also include a small habit tracker grid on your first page. List five habits you want to build down the left side. Create small squares across from each habit to check off as you complete them. This gives you a quick view of your progress whenever you flip to the beginning of your journal.
Adapting Bullet Journal Ideas for Different Needs and Preferences
Your bullet journal's first page should match how you actually plan and organize your life. The way you set up your opening page can make a big difference in whether you'll use your journal every day or let it sit on a shelf.
Customizing for Different Ways of Planning
Your first page can work in different ways depending on how your brain likes to organize information. If you prefer visual planning, you might want to create a first page with small icons or symbols that represent each section of your journal. Draw tiny calendars, checkboxes, or color-coded tabs that show where things are located.
If you like detailed planning, your first page could include a mini index with page numbers already filled in for the sections you know you'll create. You can also add a quick reference guide that explains your color-coding system or the symbols you'll use throughout your journal.
For people who prefer simple planning, a basic title page with just your name and the year works perfectly. You don't need fancy designs or complex layouts to make your journal useful. A clean first page with three or four lines of essential information gives you everything you need without feeling overwhelming.
Choosing Fun Ways to Organize To-Do Lists
Your first page can preview how you'll handle your to-do lists throughout the journal. You might include a sample layout showing whether you prefer checkboxes, bullet points, or numbered lists. This helps you stay consistent as you move through your journal.
Try adding a small practice to-do list directly on your first page with three types of tasks: urgent, important, and someday items. Use different symbols or colors for each type. This creates a quick reference you can flip back to whenever you start a new page.
You can also include a legend that shows how you'll mark completed tasks. Some people draw an X through the box, others fill in the circle, and some add a satisfying checkmark. Whatever feels most rewarding to you should go on that first page as a reminder.
Best Way to Brainstorm
So...now you have loads of great bullet journal ideas to ace the first page of your new bullet journal. How are you supposed to decide which of those greaat ideas is best for you?
Start by writing down what you want your first page to do. Ask yourself if you need it to be functional, decorative, or both. This helps narrow down your choices.
Create a simple sketch before you commit to your actual page. Use scrap paper to try different layouts and see what fits best. Draw boxes where text will go and circles where decorations might appear.
Look at bullet journal page ideas that match your skill level. If you're new to drawing, pick designs with simple lines and shapes. You don't need to create complex artwork for an effective first page.
Set a timer for 10 minutes and list everything that comes to mind. Don't judge your ideas during this time. After the timer ends, review your list and circle the ones that excite you most.
And there you have it...loads of bullet journal first page ideas! Have any favorite ideas that we missed? Be sure to share in the comments! And happy (first page) journaling, friend!
Disclosure: While all opinions are our own, we are a participant in the Amazon Services LLC Associates Program and other affiliate advertising programs, designed to provide a means for us to earn fees by linking to Amazon.com and affiliated sites, at no additional cost to you.